Johnny Pi, I am your father — part 2: the joystick
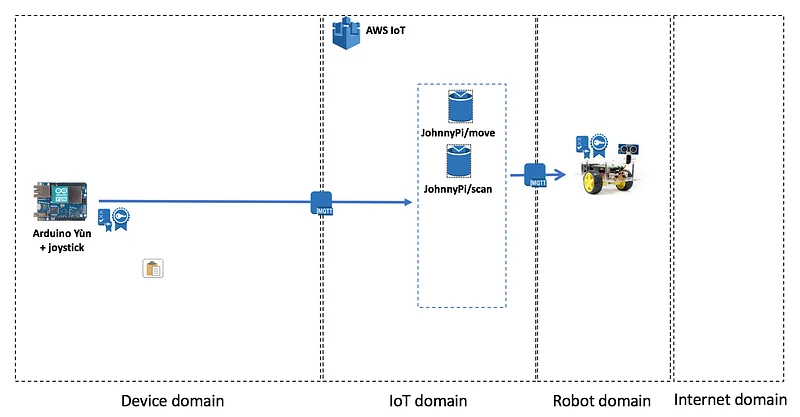
In the previous post, we laid the foundations for movement, thanks to simple messages sent to our robot through AWS IoT.
In this post, I’ll show you how to control the robot with a joystick connected to an Arduino Yùn. I simply *love* this small device, as it is actually powered by two CPUs:
- An Atheros CPU able to support a basic Linux distribution like OpenWRT. This is were the AWS IoT SDK will run.
- An ATmega32 CPU running the Arduino code and connected to multiple analog and digital ports.
Both CPUs are connected by a serial bridge, allowing the Arduino code to transparently invoke Linux APIs. The best of both worlds :) Very clever design!
What we’ll need
Here’s the shopping list:
- an Arduino Yùn. I strongly suggest that you purchase one from the official Arduino store or at a least from a reputable vendor. Believe it or not, there are plenty of counterfeits out there. I got one by accident and it didn’t work at all :-/
- an Arduino joystick, similar to this one. If you’re keen of playing with more sensors, I’d recommend buying a complete kit like this one: I did and they’re great fun.
The Chatbot Conference On September 12, Chatbot's Life, will host our first Chatbot Conference in San Francisco. The…www.eventbrite.com
Registering the Arduino in AWS IoT
Just like for our Raspberry Pi robot, we need to register the Arduino in AWS IoT, create a certificate, a key pair, etc. The process is exactly the same, so just repeat the same steps and download all credentials on your local machine.
Installing the AWS IoT SDK
Ditto for the AWS IoT SDK installation. The only difference is that the installation script will install both the SDK and the credentials on the Arduino, so you do need the register the Arduino before installing the SDK. The process is a little more involved that for the Pi, but stick to the instructions and you’ll be fine.
Connecting to AWS IoT
We’re now ready to fire up the Arduino IDE. First, let’s write aws_iot_config.h, where we’ll define all parameters required to connect. Obviously, you’ll need to replace XXX with the appropriate values, namely:
- the prefix of the private key and the certificate,
- the hostname of the IoT broker, which you’ll find either in the console or by issuing the ‘aws iot describe-endpoint’ CLI command.
Ok, now let’s take a look at the joystick and how we’ll connect it to the Arduino.
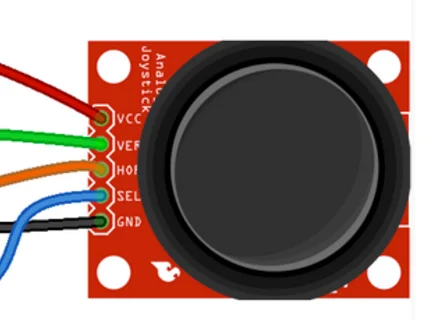
Connecting the joystick
The joystick has five analog pins. From top to bottom:
- Vcc → connected to +5V.
- Vertical movement → connected to A0.
- Horizontal movement → connected to A1.
- Selector. The joystick has a button located on the side. I found mine to be quite imprecise and I’ve decided not to use it. We’ll use an AWS IoT button instead in a future post :)
- GND → connected to ground.
Writing the Arduino code
Arduino programs have a simple structure:
- a setup() function called once at power-on: this is where we’ll connect to AWS IoT and calibrate the joystick, i.e. read the voltage on the analog pins where the joystick is in the neutral position.
- a loop() function called ‘forever’, or at least until you kill power: this is where we’ll read the voltage of the pins connected to the joystick, find out in which direction it moved, and then send the appropriate message to the JohnnyPi/move topic.
Let’s get to work.
The setup() function
As you can see, we use the three APIs from the AWS IoT SDK: setup(), config() and connect(). If all three succeed, then we’re connected to the message broker. Nothing complicated.
The loop() function
Here, we read the voltage on the X and Y pins, subtract the neutral voltage and figure out in which direction the joystick has moved. Then, we publish the proper message to the JohnnyPi/move MQTT topic using the publish() API. We use QoS 1 for guaranteed delivery.
That’s all it takes. Not a lot of code, is it? You’ll find everything on Github.
Demo
You can see the whole thing in action in the video below. The actual demo starts at 29:15.
What’s next
In the next post, I’ll take you through integration with Amazon Polly. Time for our little friend to speak!
As always, thank you for reading and for your support :)
Part 0: a sneak preview
Part 1: moving around
Part 3: adding cloud-based speech
Part 4: cloud-based vision
Part 5: local image classification with MXNet