Johnny Pi, I am your father — part 6: now I’m pushing your button, ha!
In previous posts, we gave our robot the gift of sight thanks to Amazon Rekognition and Apache MXNet, as well as the gift of speech thanks to Amazon Polly.
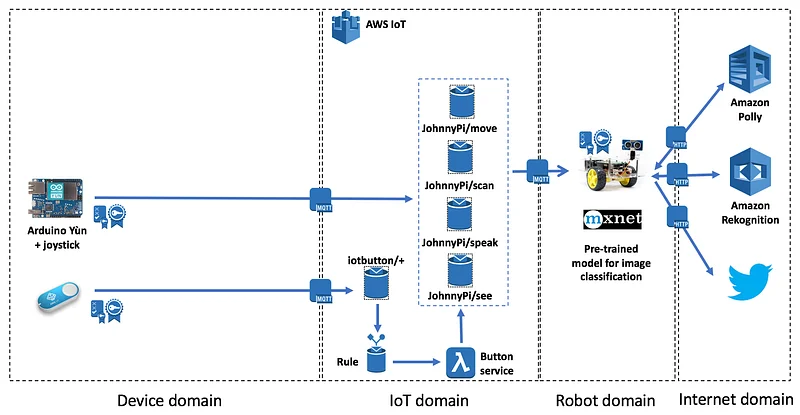
In this post, I’ll show you how to send orders to the robot with an AWS IoT button. Specifically, pushing the button will trigger object detection using the MXNet model.
Let’s get started.
Registering the IoT button in AWS IoT
Just like for the robot and the joystick, we need to register the IoT button in AWS IoT: create a certificate, a key pair, an IAM policy, etc. The process is always the same, so just repeat the same steps and download all credentials on your local machine.
Setting up the IoT button
This couldn’t be simpler. Just press the button for 5 seconds and a new Wi-Fi hotspot will appear. Connect to it, enter the Wi-Fi settings and the endpoint of the IoT gateway, upload the credentials and you’re done.
If you need help with the two previous steps, here’s a detailed video tutorial I recorded some time ago.
Now let’s take care of the Lambda function which will be invoked when we press the button.
Creating a role for the Lambda function
You didn’t think you’d escape IAM,did you? ;) Of course, we need to create a role — let’s call iotButtonLambdaRole — and a policy allowing the Lambda function to connect to AWS IoT and publish a message to the MQTT topic. Just go the the IAM console, create the role as a Lambda service role and attach the following policy.
The last statement is important. It allows the Lambda function to log in CloudWatch logs and you might need it for debugging later on ;)
Writing the Lambda function
We’ll keep things very simple: whenever the button is pushed and whatever the click type (short, long or double), we’ll post an message to the JohnnyPi/see MQTT topic.
If you’re curious how to use different click types to do different things, here’s another post that shows you how to do that.
Here’s the code for the Lambda function.
As you can see, this is pretty straightforward. We’re reusing the same IoT code as for the robot. Just make sure you used the right IoT credentials in iot_config.py.
Packaging and creating the Lambda function
We need to embed the AWS IoT SDK in the function package, so let’s first install it locally.
pip install AWSIoTPythonSDK -t .
Then, we simply need to zip everything…
zip -9r lambda.zip AWSIoTPythonSDK* iot_config.py lambda.py
…and we can create the function with the AWS CLI.
aws lambda create-function --function-name iot_pi
--handler func.lambda_handler --zip-file fileb://lambda.zip
--runtime python2.7 --memory-size 128 --region eu-west-1
--role arn:aws:iam::ACCOUNT_NUMBER:role/iotButtonLambdaRole
Or you can click in the console, you devil you!
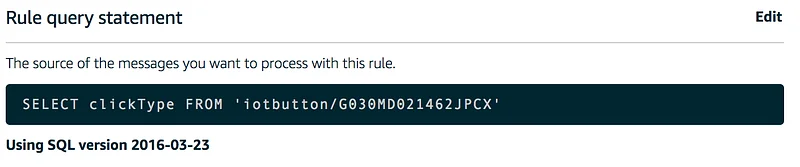
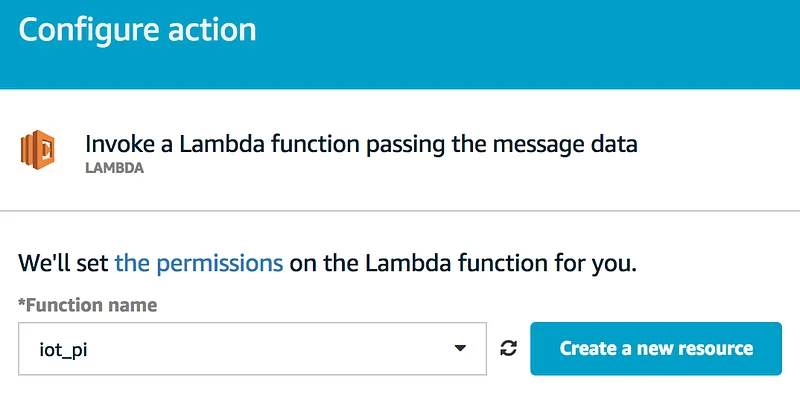
Writing the AWS IoT rule
We’re missing one last part: the IoT rule which will trigger the Lambda function whenever a MQTT message is sent by the IoT button.
Read this if you’re unfamiliar with rules.
Just head out to the IoT console and create the rule. It couldn’t be simpler: select every single message…
…and invoke the Lambda function.
Testing and troubleshooting
Just push the button and see what happens :) If you run into issues, here are some troubleshooting tips:
- Test that the button successfully connects to the IoT gateway and posts the message. You should see this on the dashboard of the IoT console. If not, check Wi-Fi settings, button credentials and button policy.
- Test that the rule works. If the Lambda isn’t invoked, check rule settings, especially the topic name. It’s easy to get the serial number wrong.
- Test that the function works. If the Lambda fails, head out directly to CloudWatch Logs and you’ll get more information.
At some point, it’s going to work and it should look something like this. The video below is in French but you’ll get the point, I’m sure. Make sure to enable automatic subtitles for extra fun!
That’s it for today. As usual, you’ll find all code on Github. In the next post, we’ll build an Alexa skill to issue voice commands!
Thanks for reading.
Part 0: a sneak preview
Part 1: moving around
Part 2: the joystick
Part 3: cloud-based speech
Part 4: cloud-based vision
Part 5: local vision
This post was written in the Air France lounge at JFK, the proud home of the crappiest wi-fi connection this side of Alpha Centauri. To make things worse, harmful doses of caffeine and Mercyful Fate were unsuccessful in countering the effects of jet lag. Oh well.