Johnny Pi, I am your father — part 7: son, we need to talk
Previously, we used an AWS IoT button to trigger object detection on our robot. However, this is a pretty poor way to interact. Wouldn’t it be just simpler and more fun to speak to it? Of course!
In this post, I’ll walk you through an Alexa skill that I wrote to send voice commands to the robot.
Why not Alexa on the Pi?
You can definitely set up Alexa on the Pi itself: the AlexaPi project lets you connect a Pi to the Alexa Voice Service (AVS) and process voice commands, provided that you connected a microphone on one of the USB ports (duh).
The setup process is a little hairy, but I did get things to work. Here’s a quick demo.
However, the overall results were pretty poor because my cheap USB microphone is absolute crap!
As a side note, this made me appreciate how amazingly good the Amazon Echo microphones are.
Anyway, even with a decent mike, the robot obviously needs to be close enough to hear you… and I wanted to be able to talk to a remote robot as well :) For these reasons, I decided not to go the AlexaPi way. Instead, I opted for an Amazon Echo device with a custom skill.
Designing the skill
As you probably know, an Alexa skill requires two components:
- An interaction model, where you will focus on the conversation itself (utterances, intents, slots).
- An AWS Lambda function, which will be invoked during the conversation to maintain the session, perform input validation, trigger actions, etc.
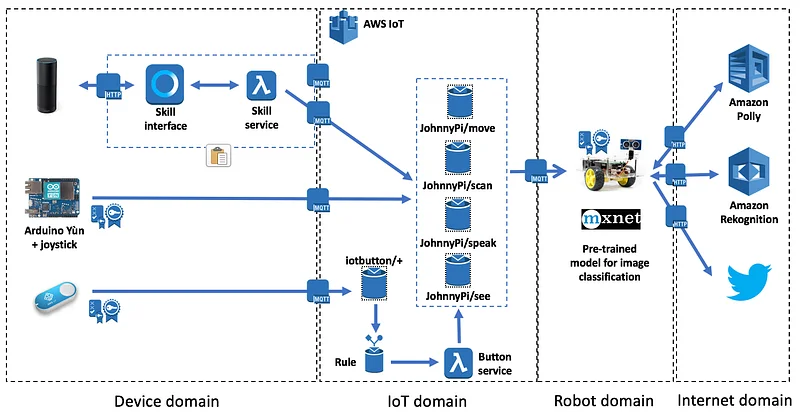
Here, the interaction model is pretty simple. I’ll either ask the robot to move around or to look at objects or faces. Thus, we’ll need to define two intents: DirectionIntent and SeeIntent.
As far as the Lambda function is concerned, it will use AWS IoT to send the proper MQTT messages to the robot, just like we’ve done with the joystick and the IoT button. It worked well so far and if it ain’t broken, I sure ain’t gonna try to fix it :*)
Interaction model: defining custom slots
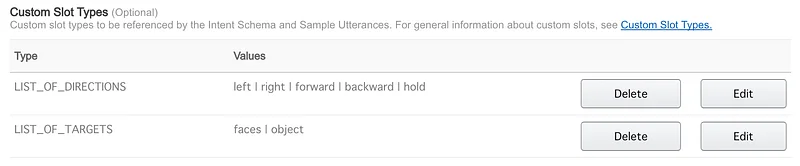
The movement commands we’d like to send the robot are what you’d expect: right, left, forward, backward, hold, slower, faster. Let’s define a custom slot, called {Direction}, with all these values.
We’ll also ask the robot to look at objects and faces. For this purpose, let’s create a second custom slot, called {Target}, holding two possible values: ‘object’ and ‘faces’.
Once you’re done, this is how your intent schema should look.
Interaction model: defining utterances for DirectionIntent
Then, we need to come up with a number of different utterances that we’re likely to use. Here are some examples:
DirectionIntent move {Direction}
DirectionIntent go {Direction}
DirectionIntent turn {Direction}
DirectionIntent now move {Direction}
DirectionIntent now go {Direction}
DirectionIntent now turn {Direction}
DirectionIntent just go {Direction}
DirectionIntent just move {Direction}
DirectionIntent just turn {Direction}
DirectionIntent I want you to go {Direction}
DirectionIntent I want you to move {Direction}
DirectionIntent I want you to turn {Direction}
Some combinations do sound a little weird, such as “just turn forward”, but nothing that would really require us to create different intents for left/right and forward/backward.
Interaction model: defining utterances for SeeIntent
Again, we have to create a custom slot, called {Target}, holding two possible values: ‘object’ and ‘faces’. Here are some of the utterances:
SeeIntent Look at the {Target}
SeeIntent Take a look at the {Target}
SeeIntent Just look at the {Target}
SeeIntent Tell me about the {Target} you see
SeeIntent Tell me about the {Target} in front of you
SeeIntent What is the {Target} in front of you
SeeIntent Do you see the {Target} in front of you
SeeIntent Do you see an {Target}
SeeIntent Do you see {Target}
SeeIntent How many {Target} do you see
SeeIntent Describe the {Target} you see
I’m sure you’ll have additional ideas, just add them to your list.
Implementing the Lambda function
We’re finished with the interaction model. Let’s now take care of the Lambda function which will perform the actual processing.
Starting from a vanilla skill and customizing is the simplest way to get this done. Thus, I will only highlight the parts that are specific to this skill.
Lambda function: connecting to AWS IoT
First, we need to create AWS IoT credentials for the skill (certificate, key pair, IAM policy). We’ve done this many times before and the process is always the same: just repeat the same steps and download all credentials on your local machine.
Here’s the IAM policy you should attach to the skill thing in AWS IoT and to the Lambda function itself.
Time to write the function itself. First, we have import the AWS IoT SDK and the IoT credentials. Let’s also define a couple of helper functions.
Lambda function: defining messages
This is pretty easy :) Just change the messages in the vanilla skill functions.
Lambda function: handling DirectionIntent
Nothing really complicated here:
- Check that the Direction slot is present and valid,
- Connect to AWS IoT,
- Publish an MQTT message containing the direction in the ‘JohnnyPi/move’ topic,
- Disconnect from AWS IoT.
In this context, I found that it was more reliable to connect and disconnect every time. Not sure why, although the latency is hardly noticeable. Feel free to try something different.
There’s a tiny hack in this code that I was too lazy to fix. We can’t use the word ‘stop’, as it’s reserved by Alexa to stop the skill. That’s why I use ‘hold’ instead: although I’m actually sending ‘stop’ to the robot as this is the command I’ve implemented there ;)
Lambda function: handling SeeIntent
The handler function for SeeIntent has a similar structure, but it is a little more complex. Indeed, we need to handle two different cases:
- looking at objects: we’ll perform a call to Amazon Rekognition.
- looking at faces: we’ll use a local Apache MXNet model.
In both cases, we’re also instruction the robot to tweet the picture. You can see past pictures here.
Lambda function: dispatching the intents
The last bit we need to implement is the intent dispatcher. Pretty straightforward.
We’re now done with the Lambda function. Time to package and deploy it.
Lambda function: packaging and deploying
Three actions are required:
- install the AWS IoT SDK,
- create a ZIP file holding the function and the SDK,
- create the function in AWS Lambda.
Here are the corresponding commands, which you need to run in the directory holding the function code.
$ pip install AWSIoTPythonSDK -t .
$ ls -p
AWSIoTPythonSDK/
AWSIoTPythonSDK-1.2.0.dist-info/
certs/
lambda.py
iot_config.py
$ zip -9 lambda.zip .
$ aws lambda create-function --function-name alexaJohnnyPi \
--handler lambda.lambda_handler --zip-file fileb://lambda.zip \
--runtime python2.7 --memory-size 128 --region REGION_NAME \
--role arn:aws:iam::ACCOUNT_NAME:role/ROLE_NAME
Demo time!
All right, all the pieces are in place, let’s test them. Here’s a recent video from the AWS Loft in London. My session was an introduction to Deep Learning and the actual demo starts at the 59:30 mark.
Pretty cool, don’t you think? As usual, you’ll find all code on Github.
That’s it for today. In the next and possibly last part of this story, we’ll have the robot send text strings back to the Alexa skill instead of speaking through Amazon Polly. Until then, thank you for reading and keep building.
Part 0: a sneak preview
Part 1: moving around
Part 2: the joystick
Part 3: cloud-based speech
Part 4: cloud-based vision
Part 5: local vision
Part 6: the IoT button
This post was written while listening to this Gamma Ray best-of. German Power Metal be blessed \m/