The purpose of this article is to show you to handle multichannel audio streams, which may be found in DVDs and in multimedia files.
For this, we'll use the following tools:
- ffmpeg, the best general-purpose tool for audio transcoding. I showed you how to build it in a previous article.
- libdca and its tools, a library specialized in decoding the DTS Coherent Acoustics (DCA) codec,
- aften, an advanced AC3 encoder which improves on the one included in ffmpeg,
- audiosplit and audiocombine, two nice and simple tools which split and combine (duh) multichannel WAV files.
- mediainfo : the best tool to learn everything there is know on the true nature of your media files. I also showed you how to build it in a previous article.
At the time of this writing, the latest version is 0.0.5. Let's get the source, build it and install it:
ubuntu% wget http://download.videolan.org/pub/videolan/libdca/0.0.5/libdca-0.0.5.tar.bz2
ubuntu% bzip2 -d
libdca-0.0.5.tar.bz2
ubuntu% tar xvf libdca-0.0.5.tarubuntu% cd libdca-0.0.5
ubuntu% ./configure --prefix=/usr/local
ubuntu% make
ubuntu% sudo make install
This obviously installs the library itself, but also the dcadec tool which we'll use later on.
2) Installing aften
In order to build aften, we need to install cmake:
ubuntu% sudo apt-get install cmakeNow, let's get the source, build it and install it. At the time of this writing, the latest version is 0.0.5.
ubuntu% svn co https://aften.svn.sourceforge.net/svnroot/aften aften
ubuntu% cd aften
ubuntu% mkdir defaultubuntu% cd defaultubuntu% cmake .. -DCMAKE_INSTALL_PREFIX:STRING="/usr/local"
ubuntu% make
ubuntu% sudo make install
3) Installing audio_split and audio_combine
These tools require the libsndfile library:
ubuntu% sudo apt-get install libsndfile1-devNow, let's build the tools:
ubuntu% wget http://freshmeat.net/redir/audio_combine/72754/url_zip/audio_combine1.00.zip
ubuntu% unzip audio_combine1.00.zipubuntu% cd audio_combineubuntu% make
There is no installation procedure, so just copy audio_split and audio_combine to /usr/local/bin.
4) Example #1: (DTS --> AC3 5.1) & (DTS --> AC3 stereo) with ffmpeg
Let's look at thesample file:
ubuntu% mediainfo audio.dtsAs you can see, this is DTS 5.1 at 1,536Kbit/s. We can easily convert it to AC 5.1 with ffmpeg:
General
Complete name : audio.dts
Format : DTS
Format/Info : Digital Theater Systems
File size : 9.04 MiB
Duration : 49s 381ms
Overall bit rate : 1 536 Kbps
Audio
Format : DTS
Format/Info : Digital Theater Systems
Bit rate mode : Constant
Bit rate : 1 536 Kbps
Channel(s) : 6 channels
Channel positions : Front: L C R, Surround: L R, LFE
Sampling rate : 48.0 KHz
Resolution : 16 bits
ubuntu% ffmpeg -i audio.dts -acodec ac3 -ac 6 -ab 448k audio.ac3448 KBit/s is the maximum authorized AC3 bitrate for DVDs. However, if you intend to play the file on the Playstation 3, you can go up to 640Kbit/s.We can also convert the DTS file to 2-channel AC3:
ubuntu% ffmpeg -i audio.dts -acodec ac3 -ac 6 -ab 448k audio.ac3 Any other number of channel leads to this error (e.g. 3 channels) :'Resampling with input channels greater than 2 unsupported.
Can not resample 6 channels @ 48000 Hz to 3 channels @ 48000 Hz'
All in all, ffmpeg is a nice and easy solution if you want to preserve the same number of channels or if you want to downmix to stereo. Anything more complex requires other tools.
5) Example #2: (DTS --> AC3 5.1) with dcadec and aften
Let's revisit the previous example but with different tools. We'll use dcadec to decode the DTS file and aften to encode it to AC3.
In in simplest form, dcadec plays DTS files:
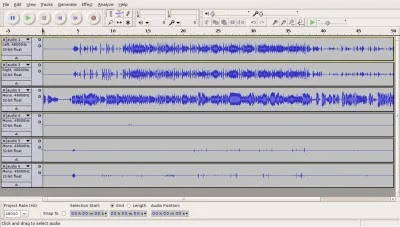
ubuntu% dcadec audio.dtsWhat we really want to do is to decode it to a WAV file:ubuntu% dcadec -o wav6 audio.dts > audio.wav6For the sake of completeness, you could also do this:ubuntu% ffmpeg -i audio.dts audio.wav6 One way or the other, we've just created a 6-channel WAV file:ubuntu% mediainfo audio.wav6Here's the file displayed by Audacity: 6 channels indeed!
General
Complete name : audio.wav6
Format : Wave
File size : 55.2 MiB
Duration : 50s 240ms
Overall bit rate : 9 216 Kbps
Audio
Format : FFFE
Codec ID : FFFE
Codec ID/Info : Extensible wave format
Codec ID/Hint : Extensible
Bit rate : 9 216 Kbps
Channel(s) : 6 channels
Sampling rate : 48.0 KHz
Resolution : 32 bits
Now, let's encode this file as to 6-channel AC3 @ 640 Kbit/s with aften:
ubuntu% aften -b 640 audio.wav6 audio.ac3That's it! In fact, you can do it in one step by piping the dcadec output into aften:ubuntu% dcadec -o wav6 audio.dts - | aften -b 640 - audio.ac3 What's the point of doing this instead of using ffmpeg? Well, dcadec and especially aften have plenty of options which allow very fine control on the output file. Why don't you check for yourself with 'dcadec -h' and 'aften -longhelp' ? ;)6) Example #3: (DTS --> AC3 3.0) with dcadec and aften
In this example, we're going to encode the DTS file to AC3.0, i.e. we'll just use the left front, center front and right front channels.
Why would you want to do that? Well, less channels allow a lower bitrate, so saving space is an obvious reason. Another one could be to keep the orginal bitrate and "spend" the savings to increase the quality of the front channels. We'll try both :)
Anyway, the channel order for the sample file is front left, front right, front center, low frequency effect (LFE), surround left and surround right. Thus, we only need channel 1, 2 and 3 from that file.
Let's decode the DTS file to WAV:
ubuntu% dcadec -o wav6 audio.dts > audio.wav6Then, let's split the multichannel WAV file into individual mono WAV files:ubuntu% audio_split audio.wav6 fl.wav fr.wav fc.wav lfe.wav sl.wav sr.wav Now, we'll recombine the 3 channels we want to keep and encode them to AC3:ubuntu% aften -acmod 3 -chconfig "3/0" -ch_fl fl.wav -ch_fc fc.wav -ch_fr fr.wav audio.ac3Now, with the maximum AC3 bitrate:
progress: 100% | q: 264.5 | bw: 31.0 | bitrate: 256.0 kbps
ubuntu% ls -l audio.ac3
-rw-r--r-- 1 julien julien 1608704 2009-01-16 21:23 audio.ac3
ubuntu% aften -b 640 -acmod 3 -chconfig "3/0" -ch_fl fl.wav -ch_fc fc.wav -ch_fr fr.wav audio.ac3That's a much bigger file : let your ears decide if the second file sounds better than the first :)
progress: 100% | q: 379.9 | bw: 60.0 | bitrate: 640.0 kbps
ubuntu% ls -l audio.ac3
-rw-r--r-- 1 julien julien 4021760 2009-01-16 21:25 audio.ac3
This is just a quick introduction to aften, which also offers many sound processing settings for you to play with. Have fun and as always, all comments welcome.